 Whether you are shifting to a new place or renovating your house, updating your kitchen with modern appliances not only provide a smart look to your kitchen but also assist you doing your daily kitchen tasks more conveniently. Today, we will fully detail how to install a range hood vent through the wall.
A range hood can be a fantastic option for maintaining your kitchen hygiene. It is a device that hangs over your kitchen stove venting out smoke, steam, fumes and other airborne greases.
As the name suggests, a range hood sucks unwanted smoke and gas from distance using a powerful mechanical fan leaving your kitchen clean and fresh after every meal.
Mounting a new vent hood looks very simple. However, looking simple and actually being simple is totally two different things. But, replacing a range hood is a much easier task compared to putting in a completely new range hood system.
To make things easy for you, here I have assembled very specific information about how to install a range hood vent through the wall. So, let’s begin the smooth installation process.
Installing a Range Hood Vent through the Wall: The Simplest and Smartest Procedures
A range hood vent keeps your kitchen beautiful by taking the smoke and grease in. Don’t get upset with its price as you will surely be satisfied with its outstanding and long-lasting performance.
While installing a range hood you will find yourself into one of the following two situations.
- Preparing & Installing the Range Hood Vent for the First Time
- Replacing an old Range Hood Vent
Don’t worry; I will discuss both situations in this article. So, let’s see the things needed to start the process.
Things Needed
- Hammer
- Screwdriver
- Insulated gloves
- Wire cutters
- Caulk
- Cable ripper
- Electric drill machine
- Reciprocating saw
- Masonry saw
- Duct pipe
Installing a Range Hood Vent for the First Time
In some houses, a range vent hood was never used. However, it is simple to make your kitchen suitable for installation one. Steps are given below
Step 01
Draw four marks on the wall where you are going to make holes to attach your new vent.
Step 02
As most drywalls are thin, you can easily penetrate them with a drill machine. Make sure that you do not tear any important electric line hidden inside the wall.
Step 03
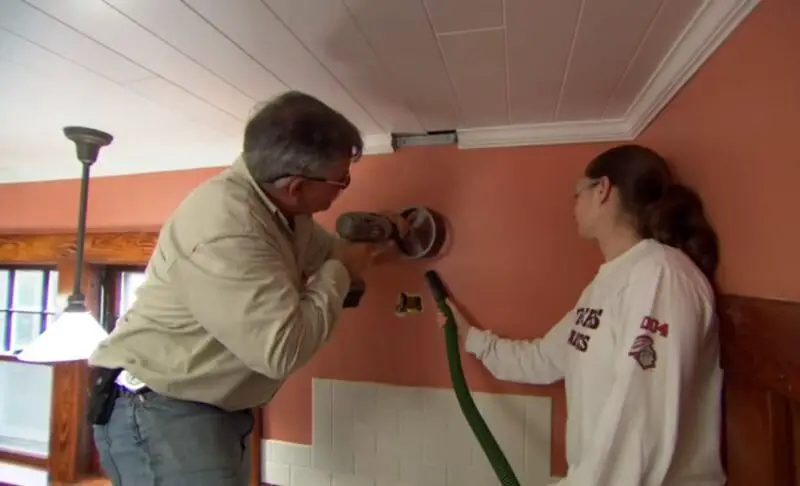
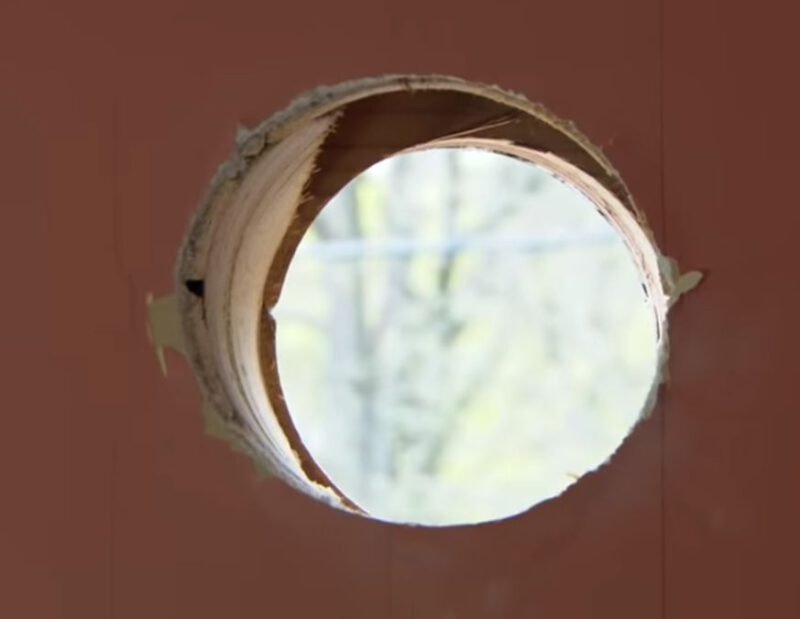
Create a rectangular sketch and apply a reciprocating saw to cut out that part of the wall. Clean and ensure that any insulation or rubbish do not stay in the hole.
Step 04
The hole should lead outside of your residence. If your kitchen is located in the middle of the house, you need to spend more money and effort making the hole. As you may need to cut and make the hole through the rooftop.
Step 05
Now, you need to make the same sized hole on the outer side of your home. Use a masonry saw and drill machine for this operation. Use a hammer to break the stone resulting in a moderate duct which is connected to your kitchen.
Step 06
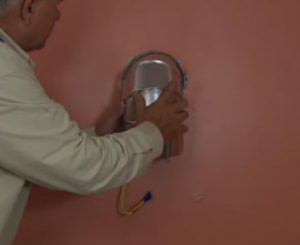
After making the canal, ensure to safeguard the uncover ends of both holes with vent covers. Tighten the vent cover on its position with a screwdriver.
Steps to Replacing an old Range Hood Vent
In most cases, we have to replace our range hood. To replace a vent hood, we need to remove the old one. So, follow the instructions given below to safely remove a vent hood.
Step 01: Removing Old Range Hood Vent
Carefully remove the electrical connections of the hood. You will find these connections underneath the light fixture.
After removing all connections, you should take out the nuts which are holding the vent hood with the help of a screwdriver. As the range hood is a very heavy object, you cannot lift and lower it down alone. Ask someone to assist you in this step. Carefully remove the screws and put the hood aside.
Step 02: Testing and Checking the New Range Hood
After going through one of the above-mentioned processes, now, you are fully ready to start the installation process of a new hood. But, before mounting the range hood on its pre-assigned position, you need to test and check your new hood. The process is given below-
- You will find a hole in the new hood which is used for venting. Carefully, open this hole and wiring knockout.
- You will find a metal covering beside the light fixture of your new range hood. In some range hood, the whole thing is guarded by a broad panel. However, detach this covering sheet revealing fan and wiring assembly.
- Attach the hood to a power supply and check the power. Now, switch the power on, and check all the functionalities of the rand vent hood. Don’t forget to check whether the fan settings and light fixture are working properly.
- If you find any fault while testing the appliance, you should contact the seller immediately. They will solve the problem for you. Skipping this checking and testing process can cause a great problem for you. So, don’t take these steps lightly.
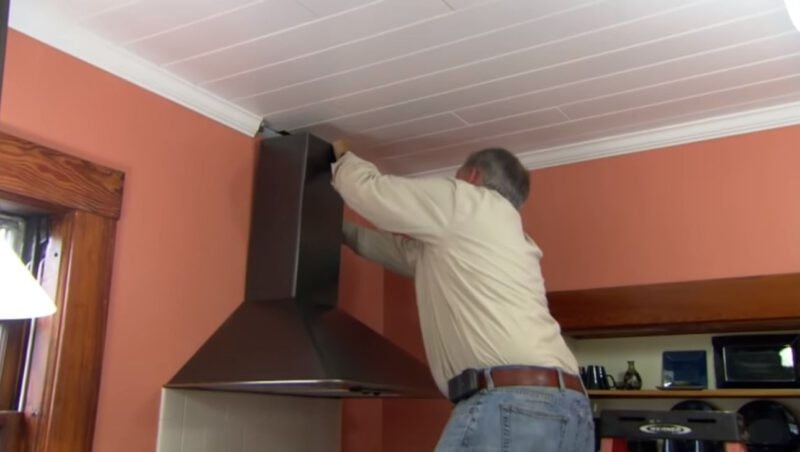
Step 03: Mount the New Range Hood
If you find everything is alright in the checking and testing steps then proceed to the following instructions and finish installing the range hood vent.
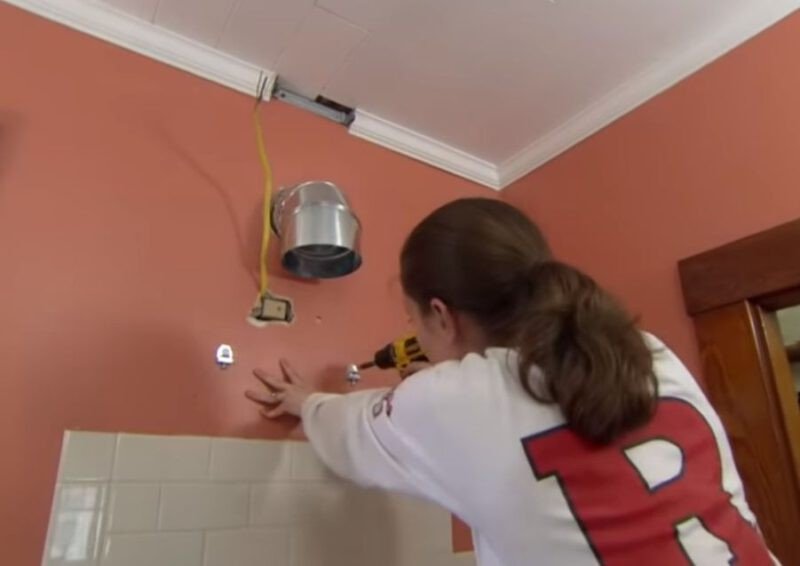
- You will find tiny holes in the backside of the range hood. Grab the wires from your kitchen’s wall and insert them into these small holes, connecting the wires to the cable clamp of the device.
- You will find 2 black as well as 2 white wires for the fan and the light. Connect black wires of the hood to the black wire coming from the wall and white to white. The green wire is for grounding. Connect this wire to the green screw.
- Reattach the grease filters to the range hood. Afterward, restore the vent hood cover by fastening the screws.
- Ensure that the duct and opening of the hood are properly aligned. Attach the screws to the drilled holes accurately to finish the installation process.
- After placing all the screws securely, power on the vent hood to check whether the ventilation process is working smoothly.
That’s all. Congratulation! you have successfully installed a range hood vent.
Important Tips
- Purchase a vent hood fan having a good cfm (cubic feet per minute) rating.
- Place the vent hood 25-30 inches above the stove.
- Never start installing this appliance alone as any wrong step can cause a serious issue.
- Hire an electrician for fixing wires and doing electricity-related tasks
- Do not buy cheap range hood to save money. Buy branded one instead.
- Check the instruction manual that comes with the device for a better understanding of different parts of the range hood.
Safety Measures
- Make sure the electric supply is turned off while installing the vent hood
- Wear rubber shoe, hand gloves and protective goggle while working
- Keep your children away while you are installing this appliance.
- Keep you stove off while setting the hood.
Conclusion
Nothing affects our family’s health quite like the air quality in our kitchen. A perfectly placed vent hood ensures a clean and fresh environment inside your kitchen while you are cooking your favorite dish.
However, setting up a range hood can be a very complicated task if you failed to follow the aforementioned steps properly. Moreover, you need to be extra cautious while installing this appliance as it is a very expansive and heavy metal object.
I hope, with the help of this simple guide you have properly learned how to install a range vent through the wall. Now, it’s time to set this air freshening wizard into your lovely kitchen.